• Style
  • Home
  • Family
  • Life
  • Culture

A Girl Named PJ

Halloween DIY: Drip Paint Pumpkins

October 31, 2013

DIY drip paint pumpkins

Happy Halloween! Is your candy bowl filled? Doorbell in working order? How about your pumpkins — are they carved or decorated?

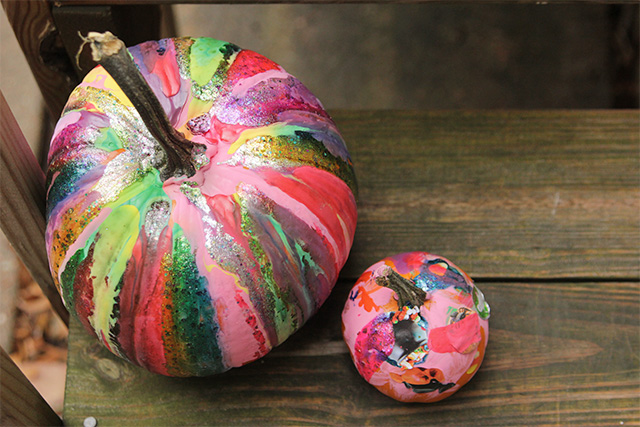
If you’re looking for a last minute Halloween arts-and-crafts project for your preschooler, why not make a drip paint pumpkin? Granted, it likely won’t be dry by the time trick-or-treaters start ringing your bell, but it’ll be a fun way to pass the time this afternoon.

(Or you can always bookmark this post or pin these images to Pinterest and make some colorful drip paint pumpkins next Halloween!)

drip paint pumpkins

Here’s what you’ll need:

  • pumpkins
  • craft paint (I chose tempera washable watercolor paint because of Levi’s age, but acrylic paint might have worked better)
  • something to elevate your pumpkin (we used a disposable Tupperware container)
  • newspapers, paper bags, or a plastic table/floor covering
  • clear acrylic sealer

drip paint pumpkins

drip paint pumpkins

I was inspired to make a drip paint pumpkin after sharing Stacy’s painted pumpkins in my no-carve pumpkin decorating round-up. Levi was incredibly excited, repeatedly asking if it was time to paint pumpkins. We set up shop in the unfinished portion of our basement the weekend that my parents were in town — with three adults crafting and one adult carving pumpkins, we needed space to spread out (and get messy!).

It turned out that, at 27 months old, Levi was a bit too young to fully appreciate our arts-and-crafts project. He lacked the hand strength to really squeeze the paint bottles without assistance — and the patience to see the pumpkin painting process through to the end!

no-carve pumpkin ideas

However, Levi was happy enough to suggest and hand over paint colors and wander around inspecting everyone’s work. Occasionally, he’d sit front of his small pumpkin to smear more paint with a paintbrush or apply more Halloween stickers.

Here’s a tip: In addition to dripping paint on top of the pumpkin, squeeze the paint onto the pumpkin’s sides just past where it starts to curve. Gravity will help the paint slide down easier!

drip paint pumpkins

drip paint pumpkins

When the paint was completely dry we spray the pumpkins with a clear acrylic sealer to give them a subtle glossy coating and (hopefully) make them slightly moisture-resistant. However, we still noticed that the paint still shriveled and cracked a bit as it dried — perhaps because we waited several days before applying the acrylic sealer. Not that it really matters; this is disposable art, anyway!

I’d love to see the pumpkins you carved or decorated for Halloween! Please post a link in the comments below or share a photo on our Facebook page. And, of course, have a very happy Halloween!

Related Posts

  • Halloween DIY: Dot Pumpkins Inspired by “Creative Galaxy”Halloween DIY: Dot Pumpkins Inspired by “Creative Galaxy”
  • St. Patrick’s Day gingerbread houseSt. Patrick’s Day gingerbread house
  • DIY envelope iPad caseDIY envelope iPad case
  • Getting in the St. Patrick’s Day SpiritGetting in the St. Patrick’s Day Spirit

SHARE THIS POST:

Pin on Pinterest
Pinterest
Share on Facebook
Facebook
Tweet about this on Twitter
Twitter


4COMMENTS | Life

« Gatorade and Saltines
Halloween candy safety tips for parents »

Let’s Discuss

  1. Amanda

    October 13, 2015 at 10:05 am

    Great Idea !!! I’m submitting this post with a round up to a client. I hope it’s ok she links to this post ! 🙂

    Reply

Trackbacks

  1. DIY heart stamp | Bunny and Dolly says:
    February 11, 2014 at 6:01 am

    […] white paper bag we already had in the house. My thought was that we’d use leftover paint from Halloween to make hearts and swirls and other pretty […]

    Reply
  2. Easy Ways to Decorate Pumpkins Without Carving - Simplify, Live, Love says:
    October 17, 2015 at 12:18 pm

    […] Halloween DIY: Drip Paint Pumpkins– A Girl Named PJ […]

    Reply
  3. DIY Heart Stamp | Honest to Nod says:
    September 2, 2016 at 11:10 am

    […] white paper bag we already had in the house. My thought was that we’d use leftover paint from Halloween to make hearts and swirls and other pretty […]

    Reply

Leave a Comment Cancel reply

Your email address will not be published. Required fields are marked *

PJ Photo (lefty)

CONNECT Social Links (righty)

LET'S
CONNECT

Pages Menu (lefty)

ABOUT PORTFOLIO CONTACT

120×600 AD Banner (righty)

“WORK With Me” Linked Graphic (lefty)

Archives Button Link (lefty)

Subscribe Links (lefty)

SUBSCRIBE

RSS FEEDLY BLOGLOVIN' EMAIL

Search – full width

DIVIDER IMAGE

Featured Series Squares

FEATURED
SERIES


DIVIDER IMAGE

Friends & Sponsors Ads

FREE
DOWNLOAD


DIVIDER IMAGE

RECENT
PINS

Jaclyn Peters Design on Instagram: "what I wouldn’t give to have a mud room like this! In our Tuxedo Mid-Century project we turned a dysfunctional room into this beautiful workhorse of a space. We removed the secondary fireplace, enlarged the living room, replaced the small windows with one large window, and added a new entry to the garage!"ORC Spring 2021: A Color Blocked Bathroom Reveal
Follow Me on Pinterest More Pins
I HAVE MORE TO SAY
JOIN MY NEWSLETTER
Exciting updates, bonus content,
exclusive giveaways

LET'S
CONNECT

A LOOK INTO MY LIFE
FOLLOW ME ON INSTAGRAM

    Copyright © 2023 A Girl Named PJ / All Rights Reserved / Disclosure / Privacy Policy