
It started with a non-sensical auto-correct on an Instagram photo. Valentine’s became Cakentine’s, and suddenly, a new holiday was born.
Today, Melissa from Lulu the Baker, MJ from Pars Caeli, and I are all sharing posts related to the classic birthday treat: Cake. Melissa has a citrus cake recipe, MJ is making individual cakes, and I’m going to teach you how to frost a cake a like a pro.
Actually, Emily Vail of Vail Custom Cakes is going to be leading the how-to. My technique for frosting a cake involves a can or store-bought icing and a butter knife. At least, it did before watching Emily work her magic with vanilla merengue buttercream and selection of professional cake decorating tools.
Emily and I have been friends since birth — literally. We were born four days apart and were next-door neighbors for the first five or so years of our lives. Now she’s an accomplished personal chef and custom cake creator. (She once made cronuts for Dominique Ansel himself!)
According to Emily, people like tall cakes because they’re very dramatic, so she demonstrated how to frost a cake using a Devil’s food and classic vanilla double-layer cake. She whipped up a vat (literally) of buttercream made with — gulp! — three pounds of butter.
Unfortunately, Emily says that you won’t get the same results with store-bought frosting. It’s just too thick. However, you could try to make it more manageable by first microwaving it and then beating it until it’s softer. And always start with more frosting than you think you’ll need!
So besides a ton of frosting and two cakes that’ve been leveled and chilled, you’ll want these baking tools:
- Cake decorating turntable
- Cake circle
- Offset spatula
- Scraper
- Pastry bag

- Star icing tip (small)

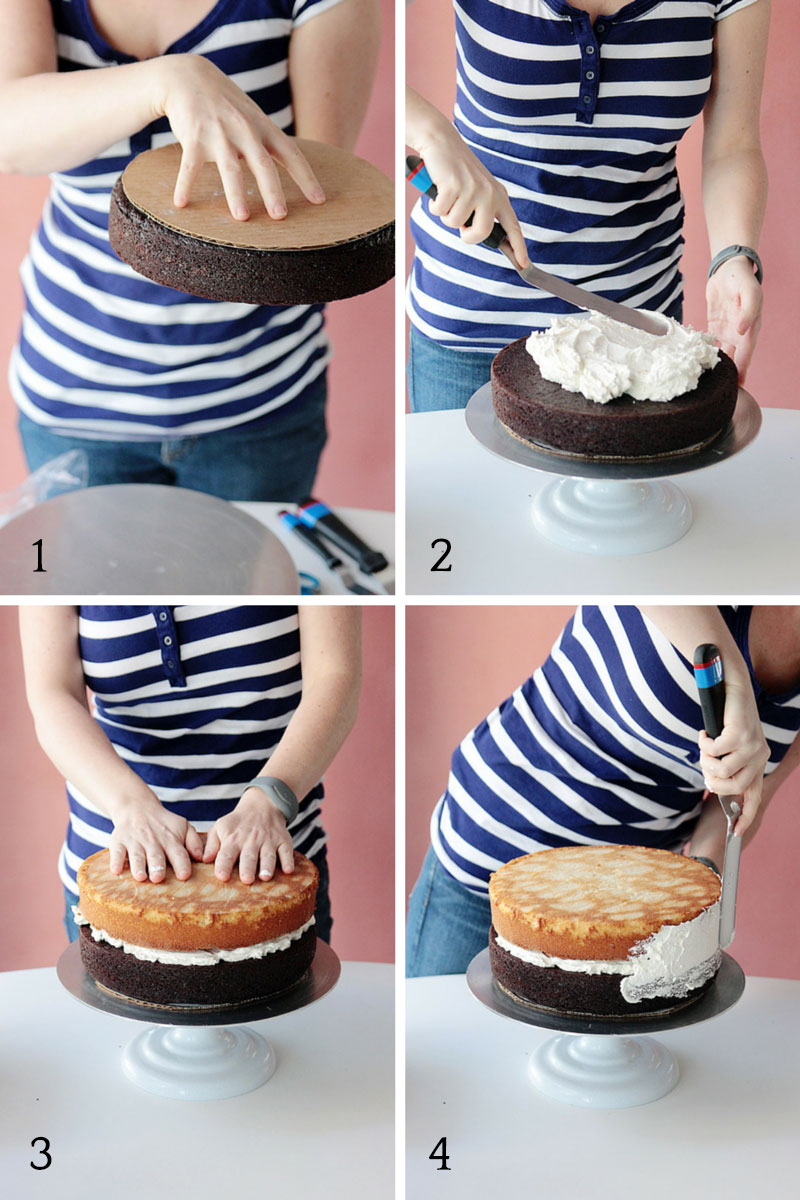
1. Place your cake on a cake circle that’s approximately 1″ smaller than the diameter of your cake. Cake boards are available in all different shapes and sizes, or you can cut your own out of clean cardboard. For this 10″ double-layer cake, Emily made a 9″ cake circle from a piece of cardboard.
2. Scoop a large amount of frosting on to the center of cake. Using an offset spatula (gripping the handle with your index finger pointed), push the icing toward the edge of the cake while spinning the turntable. Continue adding more frosting as necessary.
3. When the frosting evenly covers most of the cake (it doesn’t need to go all the way to the edge), gently add the second layer of cake.
4. Hold the offset spatula vertically as you spread a thin, even layer of frosting around the cake, using the side of the cake as a guide. Slowly spin the turntable away from you while pulling the spatula toward you.

5. Scoop an even larger amount of frosting on top of your second layer. Don’t be afraid to start with a lot (and add more as you go). You’re basically spackling the cake, so you’ll keep removing frosting as you spread it. Push the frosting out from the center and over the edge.
6. To smooth the top, hold the offset spatula with your index finger pointing to the middle of the cake and the end of the spatula pointing outward. But don’t move the spatula! Instead, move the cake by slowly spinning the turntable while applying light pressure with the edge of the spatula. Scrape excess frosting off spatula as you smooth.
7. Flip your spatula vertically so that your index finger on the outside. Holding it steady, turn the cake stand to create a crisp edge, pushing the frosting down the side.
8. Fill in the bottom of the cake using frosting from your bowl, building from the top down. More is better! Once you have a pretty good covering, remove any excess to make it smooth and fill in spots that look sparse.

Time to make your cake beautiful! Press the edge of a scraper![]() tool against the side of the cake and gently spin the turntable to smooth the frosting. Go all the way around the cake.
tool against the side of the cake and gently spin the turntable to smooth the frosting. Go all the way around the cake.

See that excess of frosting that climbed back up to the edge? Gently pull it in towards the middle of the cake using a very clean spatula. Try not to press on the cake! Remove frosting that collects on your spatula by wiping it against the blade of your scraper or a bowl.
Pro tip: Use a warm spatula to get a smoother finish with a slight mirror shine. You can warm it over the stove or in hot water (wiping it dry before each use, of course).
Smoothing takes a little bit of patience. You may need to repeat the process of scraping the sides and cleaning the edges a couple of times until the smoothness meets your satisfaction.

To remove the cake from the turntable, gently slide your spatula underneath the cake to help push it onto your hand. At this point you could simply place it on a serving plate, pop in some candles, and call it a day… or you can take it to the next level by adding decorative icing and chocolate cake crumbs.
Let’s do that.

Cake crumbs, which you can make by tossing cake that’s been dried out in a low-heat oven into a food processor, are an easy way to cover up imperfections while adding a wow factor.
Hold the cake over a bowl with your non-dominant hand. Grab a handful of crumbs with your dominant hand and gently go up the sides. Keep turning and repeating until you have gone all the way around the cake.

As you begin setting your cake on a serving plate, slide your spatula underneath as your slowly pull our your hand. Use the spatula to gently guide the cake to the center of the plate and then gently remove it. Set cake plate back on top of the turntable.
It’s nearly impossible to avoid causing an indentation along the bottom edge, but you can easily hide it with the next step: Decorative icing.

Using a pastry bag![]() (or a heavy-duty plastic freezer bag) and a small star tip
(or a heavy-duty plastic freezer bag) and a small star tip![]() , pipe a star border along the bottom edge of the cake using the press-and-go method. Hold the tip against the plate as a guide.
, pipe a star border along the bottom edge of the cake using the press-and-go method. Hold the tip against the plate as a guide.

Use the same pastry bag and piping tip to make the circular swirls on top. Although it looks like you’ll be creating a continuous line of swirls, you’re really starting and stopping. Simply begin the next swirl where the last one ended.
Pro tip: Apply less pressure as you swoosh downward to create the tail of the swirls.
Also, practice makes perfect! Emily recommends practicing directly onto a clean table so you can scrape it off and put it back in the bowl.

And there you have it! A super fancy professional-looking cake, or as Emily calls it, “a Wednesday kind of cake.”
Now be sure to hop over to Lulu the Baker for Melissa’s Everyday Citrus Cake recipe and to Pars Caeli for MJ’s Just Because Cakes. And have a very happy Cakentine’s Day!


ooh! I looooove the scraper tool trick! Totally going to try that next time. also, the photos are gorgeous!
Okay, this is perfect. My iced cakes always look pretty pathetic. I’m thinking all these cake tools are a must!
I love watching your technique. I really enjoy decorating cakes and can’t get enough practice or advice from those who love it too. I can’t wait to try this.
Ok I LOVE this post. I needed to know all of this stuff and I legit need a cake right now. Yours looks so delicious!
Thank goodness for friends who bake! My pastry chef pal taught me everything I know about frosting a cake.